How to Draw a Rose: A Step-by-Step Guide for Beginners
How to Draw a Rose
Drawing a rose can be a rewarding experience for artists of all levels. The intricate details and delicate structure of a rose make it a beautiful subject to sketch. In this guide, we’ll break down the process into simple, manageable steps to help you create a stunning rose drawing. Whether you’re a beginner or looking to refine your skills, follow along to learn how to draw a rose with ease.
Materials Needed
Before you start, gather the following materials:
- Pencil (HB or 2B for sketching)
- Eraser
- Drawing paper
- Optional: Colored pencils, markers, or paints for adding color
Step-by-Step Instructions
Step 1: Draw the Basic Shape
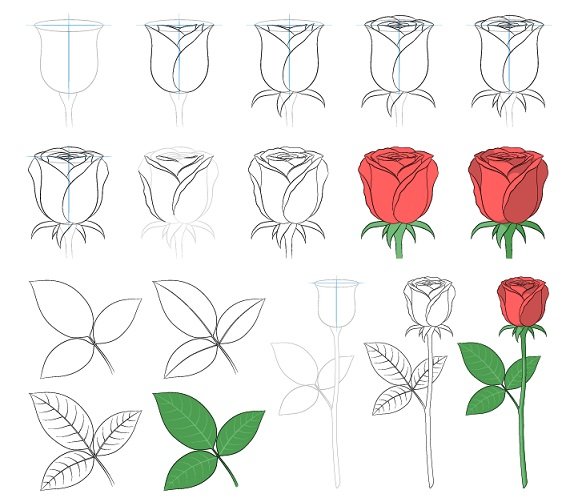
Begin by drawing a small circle in the center of your paper. This will serve as the base of the rose and guide the placement of the petals. Around this circle, draw a larger, irregular oval shape. This will define the outer boundary of the rose.
Step 2: Sketch the Inner Petals
Inside the small circle, start drawing the innermost petals. These petals are usually small and tightly packed. Use curved lines to create the appearance of overlapping petals. Don’t worry about making them perfect; natural variations will make your rose look more realistic.
Step 3: Add More Petals
Continue adding petals around the center, gradually increasing their size as you move outward. The petals should appear to overlap each other, creating a layered effect. Focus on capturing the flow and curvature of each petal. Remember, roses have a natural, asymmetrical look, so avoid making the petals too uniform.
Step 4: Define the Outer Petals
As you reach the outer edge of the rose, draw larger, more open petals. These petals often have a more pronounced curl at the edges. Pay attention to how they unfold and overlap. Use gentle, sweeping lines to create a sense of depth and dimension.
Step 5: Refine the Petal Shapes
Once you have the basic structure of the rose, go back and refine the shapes of the petals. Add details such as small folds, curves, and subtle lines to enhance the texture and realism. Use light, gentle strokes with your pencil to avoid making the drawing look too heavy or rigid.
Step 6: Draw the Sepals
At the base of the rose, draw the sepals. These are the small, leaf-like structures that protect the flower bud. Typically, there are five sepals, but you may only see a few depending on the angle of your drawing. Draw them extending outward from the base of the rose, and add a slight curve to each sepal to make them look natural.
Step 7: Sketch the Stem and Leaves
Extend a line downward from the base of the rose to form the stem. Roses often have a slightly curved stem, so don’t make it too straight. Add a few leaves along the stem by drawing elongated, serrated shapes. Roses usually have compound leaves, so draw multiple leaflets attached to a central vein.
Step 8: Add Details to the Leaves
To give the leaves more realism, add veins by drawing thin, branching lines within each leaf. The veins should radiate outward from the central vein. Pay attention to the natural shape and direction of the veins.
Step 9: Erase Guidelines
Carefully erase any unnecessary guidelines and overlapping lines that you no longer need. This will help clean up your drawing and make it look more polished.
Step 10: Shade Your Rose
Shading adds depth and dimension to your drawing. Start by identifying the light source and decide where the shadows will fall. Use a slightly darker pencil (such as a 2B or 4B) to add shading to the areas that would be in shadow, such as the inner parts of the petals and the areas where petals overlap.
Use light, gentle strokes to build up the shading gradually. Blend the shading with a blending stump or your finger to create smooth transitions. Leave the areas that catch the most light relatively light to create contrast.
Step 11: Add Final Touches
Take a step back and assess your drawing. Add any final details or adjustments as needed. You can enhance the highlights by gently erasing small areas to create the illusion of light reflecting off the petals. If you’re using colored pencils or paints, this is the time to add color to your rose.
Tips for Drawing a Rose
- Practice Makes Perfect: Drawing roses can be challenging, especially for beginners. Don’t be discouraged if your first attempts don’t turn out as expected. Keep practicing, and you’ll improve over time.
- Observe Real Roses: Study real roses or reference photos to understand their structure and details. Pay attention to how the petals overlap and how the light interacts with the flower.
- Experiment with Different Techniques: Try different drawing techniques, such as cross-hatching, stippling, or blending, to achieve different textures and effects.
- Use Light Strokes: Start with light pencil strokes to sketch the basic shapes and gradually build up the details. This makes it easier to erase and make adjustments.
- Take Breaks: If you find yourself getting frustrated or tired, take a break. Sometimes stepping away from your drawing for a while can give you a fresh perspective when you return.

Conclusion
Drawing a rose may seem daunting at first, but with patience and practice, you can create a beautiful and realistic depiction of this classic flower. By following these step-by-step instructions and paying attention to the details, you’ll be able to capture the elegance and beauty of a rose in your artwork. So grab your pencil and paper, and start drawing your masterpiece today!
Also. Read More: Best Travel Bag for Men in 2024